Advertising is the most common and important thing for a product, service, or any feature you want to sell. The common way to advertise is to make banners, hoardings, paintings, etc. But now a day’s digital display is also getting popular to display advertisement, because of their durability, and customization feature. You can set text, display images and even you can play a video on the display. These boards are a little costly but due to their features, it's gaining a place in the market. In this tutorial, we will interface a red 32x16 dot matrix display (DMD).
The size of the P10 display is 6 inches in height and 11 inches in width. The display contains a total of 512 LEDs. LED color varies according to your purchase. Here I am using a RED DMD display.
Using P10 display you can build any size of display for your advertisement board. These display boards are IP65 waterproof.
Specification of P10 display:
- Brightness - up to 5000
- Maximum power consumption - 20watts
- IP65 waterproof.
- Pixel configuration - 10mm
P10 display pin descriptions:
- Pin 1(OE)- is the enable pin and is used to control the brightness of the panel.
- Pin2 (A) and Pin3 (B) are the two selection line to select from multiple rows.
- Pin8 (CLK), Pin10 (SCLK), and Pin12 (DATA): are the control pins of the shift register.
Hardware Requirements:
- Arduino UNO board
- P10 display
- Connecting wires
Software Requirements:
- Arduino IDE (You can download it from HERE)
- DMD Library (Download it HERE)
- TimerOne Library ( Download it HERE)
Block diagram:
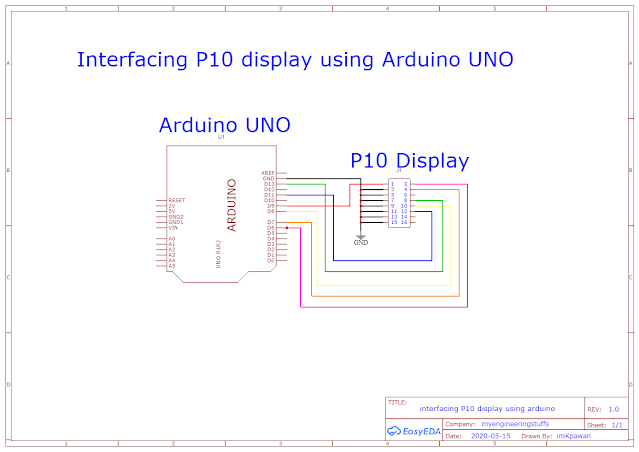
Circuir diagram: Please follow the circuit diagram and table of connection below correctly. Power to P10 display should be given externally with any 2amp 5v source.
| P10 Display | Arduino UNO |
| PIN1 (OE) | D9 |
| PIN2 (A) and PIN3 (B) | D6 and D7 respectively |
| PIN8 (CLK) | D13 |
| PIN10 (SCLK) | D8 |
| PIN12 (DATA) | D11 |
Full source code: The code I am using here is the code provided in the dem_code file of DMD library. So do not confuse on my code to interface.
Video Tutorial:


0 Comments
Please do not enter any spam link in the comment box.